Wednesday 23 December 2015

12 Days of Creepmas Day 12


Welcome to 12th and final day of the 12 Days of Creepmas.
The link to hop on over to all the other participants blogs is on my sidebar to your right. You are in for a real treat.
 
 
For my project today I have created another Bauble using one of the Raven images from the Quoth the Raven Rubber set from Smeared Ink. I started by attaching my background paper to an MDF bauble shape. I then sanded back the edges to give a vintage feel. The Raven was stamped onto Neenah cardstock and aged using Distress Ink. A frame was die cut and the stamped image inserted. This was then attached to the Bauble using 3d foam tape. To finish black satin ribbon was threaded to hang and a black satin ribbon bow.


I do hope you have enjoyed all the fabulous projects showcased from myself and all the other bloggers taking part. May I take this opportunity to wish each and everyone of you
 
 
A VERY MERRY CHRISTMAS AND A HAPPY NEW YEAR.
 
Hugs Fiona
 

Monday 21 December 2015

12 Days of Creepmas Day 11

 
Welcome to day 11 of the 12 Days of Creepmas.
The link to hop on over to all the other participants blogs is on my sidebar to your right. You are in for a real treat.
 
 
For my project today I have created a Bauble using Poe from the Quoth the Raven Rubber set from Smeared Ink. I started by attaching my background paper to an MDF bauble shape. I then sanded back the edges to give a vintage feel. Poe was stamped onto Neenah cardstock and aged using Distress Ink. A frame was die cut and the stamped image inserted. This was then attached to the Bauble using 3d foam tape. To finish black satin ribbon was threaded to hang and a black satin ribbon bow.


Thanks for taking the time to stop by and read. Your comments are always appreciated.
Hugs Fiona.


Saturday 19 December 2015

12 Days of Creepmas Day 10

 
Welcome to day 10 of the 12 Days of Creepmas.
The link to hop on over to all the other participants blogs is on my sidebar to your right. You are in for a real treat.
 
 
For my project today I have created a card using the wonderful Edgar Allan Poe Image from the Octopode Factory. I imported the image into photoshop. Added my text sentiment and printed off onto Neenah Cardstock. I then coloured up the image with copics, matted and layered and added to a black card stock base. Done.
 
 
Thanks for taking the time to stop by and read. Your comments are always appreciated.
Hugs Fiona.


Thursday 17 December 2015

12 Days of Creepmas Day 9


welcome to day 9 of the 12 Days of Creepmas.
The link to hop on over to all the other participants blogs is on my sidebar to your right. You are in for a real treat.
 
 
For todays offering I have used the digi stamp  Evil Snowman from Delicious Doodles.. I coloured up the image with copics, then scanned into photoshop. I created my ATC in photoshop added the main image then printed off and attached to a mount board base and inked the edges. I then die a cut a tag base from mountboard, attached my backing paper then attached the ATC off to one side using 3d foam. A black satin bow was then added to finish.
 
 
Thanks for taking the time to stop by and read. Your comments are always appreciated.
Hugs Fiona.


Tuesday 15 December 2015

12 Days of Creepmas Day 8, Smudgy Antics and Rick St Dennis Progressive Challenge.

 I am on Triple Duty Today so bear with me folks as this is an image heavy post. First up will be 12 days of Creepmas, next up Smudgy Antics and Finally The progressive challenge part with Rick St Dennis.
 
welcome to day 8 of the 12 Days of Creepmas.
The link to hop on over to all the other participants blogs is on my sidebar to your right. You are in for a real treat.
 
 
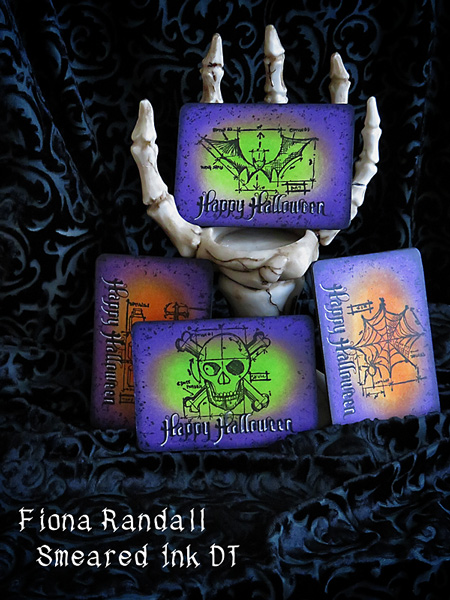
For todays offering I have used the digi stamp  from The Gross Anatomy Set from Smeared Ink. I created my ATC in photoshop added the main image and printed off and attached to a mount board base and added colour with copics and inked the edges. I then die a cut a tag base from mountboard, attached my backing paper then attached the ATC using 3d foam. A black satin bow was then added to finish.
 
 
For my project over on the Smudgy Antics Blog I have created another ATC Tag using Poe from Smeared Inks Quoth the Raven Real Rubber set. I stamped poe onto a piece of white stamping cardstock and coloured with distress Inks and framed using a spellbinders Die. I then created my ATC and Tag backgrounds in photoshop , printed off and attached to mount board bases. Inked the edges and then attached the ATC to the Tag base. The framed poe was then added using 3d foam and black satin ribbon bows added.


Next up is my contribution to The progressive challenge part 2 over on the Sparkle and Glitter Blog.
The second month of our Progressive challenge always uses an image supplied by Rick and if you took part in the first part you'll get it free. It is available to buy if you were too busy   Take yer Pick is not sure whether it's still Hallowe'en or if he should go into Christmas mode - a bit like the stores out there - selling Christmas stuff before 31st of October. So, I think, he can be forgiven for being a bit confused.
 
I coloured up the image using copics onto Neenah classic cardstock. Cut out and attached to my sentiment base ( which had been created in photoshop ) with 3d foam to make the image pop. This was then matted and layered onto black cardstock and attached to an 8x8 card base. You can't tell from the photo but I added some sparkle to the pumpkin and the present with a spectrum noir glitter brush pen.


Thanks for taking the time to stop by and read. Your comments are always appreciated.
Hugs Fiona.


Sunday 13 December 2015

12 Days of Creepmas Day 7

 
welcome to day 7 of the 12 Days of Creepmas.
The link to hop on over to all the other participants blogs is on my sidebar to your right. You are in for a real treat.
 
For todays offering I have used the digi stamp  Gravestone Scene  from Delicious Doodles. I created my card base in photoshop, added the text sentiment. Printed off and matted and layered onto a black card stock base. I die cut and embossed the poinsetta from black cardstock and attached to the card.
 
 
Simple but effective me thinks. Thanks for taking the time to stop by and read.
 Your comments are always appreciated.
Hugs Fiona


Friday 11 December 2015

12 Days of Creepmas Day 6


welcome to day 6 of the 12 Days of Creepmas.
The link to hop on over to all the other participants blogs is on my sidebar to your right. You are in for a real treat.
 
 
For todays offering I have used the digi stamp  Ram's Skully from Delicious Doodles. I created my ATC in photoshop added the main image and printed off and attached to a mount board base and inked the edges. I then die a cut a tag base from mountboard, attached my backing paper then attached the ATC using 3d foam. A black satin bow was then added to finish.
 
 
Thanks for taking the time to stop by and read. Your comments are always appreciated.
Hugs Fiona.


Wednesday 9 December 2015

12 Days of Creepmas Day 5

 
welcome to day 5 of the 12 Days of Creepmas.
The link to hop on over to all the other participants blogs is on my sidebar to your right. You are in for a real treat.
 
 
For todays offering I have used the digi stamp  Skull and Roses from Smeared Ink. I coloured the image up with copics, Scanned into photoshop and created a digital collage around the main image. I can now use this to create cards, gift tags or even as an image transfer for boxes etc.
 
 
Thanks for taking the time to stop by. Your comments are always appreciated.
Hugs Fiona.


Monday 7 December 2015

12 Days of Creepmas Day 4

 
welcome to day 4 of the 12 Days of Creepmas.
The link to hop on over to all the other participants blogs is on my sidebar to your right. You are in for a real treat.
 
For my project today I have used a  digital stamp from OddballArtCo named Skull and Crossbones available in theie Etsy Store. I coloured up the image with copics, scanned into photoshop,  added my sentiment text. Printed out and matted and layered onto a black cardstock base. Added a die cut pionsetta voila Done..........


Thanks for taking the time to stop by and read. Your comments are always appreciated.
Hugs Fiona.


Saturday 5 December 2015

12 Days of Creepmas Day 3

 
welcome to day 3 of the 12 Days of Creepmas.
The link to hop on over to all the other participants blogs is on my sidebar to your right. You are in for a real treat.


For my project today I have used Rick St Dennis MFA digital stamp FRANKIE available in his Zibbet Store. I coloured him up with copics, scanned into photoshop, added a santa hat then added my sentiment text. Printed out and matted and layered onto a black cardstock base. Done..........
 
 
Thanks for taking the time to stop by and read.
Hugs Fiona.


Thursday 3 December 2015

12 Days of Creepmas Day 2

welcome to day 2 of the 12 Days of Creepmas.
The link to hop on over to all the other participants blogs is on my sidebar to your right. You are in for a real treat.
 
Today I have created a CAS simple card featuring Smeared Ink's Reindeer from The Gothic Christmas Rubber set. I stamped onto a white card base and coloured up using copics. I then scaneed into photoshop added the text and a drop shadow to the image to make it pop. Printed out and attached to a black card base. Job dome.


Thanks for stopping by your comments are always appreciated.
Hugs Fiona.


Tuesday 1 December 2015

12 Days of Creepmas Day 1.

 Good morning and welcome to day 1 of the 12 Days of Creepmas. I am on double duty today with the Smudgy Antics blog too.
 
First up is my DT project as part of the Smeared Ink DT over on the Smudgy Antics blog. I have created an ATC on a Tag on a Tag. I am having such fun creating these you will be seeing a lot more. I started with a large MDF Tag base and covered with Smeared Ink Background paper. I then die cut a smaller tag from Mount board and stencilled some clear 3d gel through a Tim Holtz stencil and and sprinkled some wonderful deep red glitter over and put aside to set. I then created my ATC using Poe from the Smeared Ink Quoth the Raven Rubber set and another of Smeared Inks Background papers. Attached to an ATC base die cut from mount board. I then die cut and glittered some flowers and layered up. Die cut some flourishes and Stamped and glittered  the sentiment. Layered the small tag onto the large tag. Attached the ATC and the flowers and flourishes. To finish I added the sentiment and some black organza ribbon.


Next up is my project for Day 1 of the 12 Days of Creepmas. The link to hop on over to all the other participants blogs is on my sidebar to your right. You are in for a real treat.
 
Here we go and guess what I have created an ATC Tag. I used the Raven from Smeared Ink's Quoth the Raven Rubber set which was stamped with black Archival ink onto a background created in photoshop which was printed off. I then attached to a mount board ATC base for stability. I die cut the tag base from mount board and covered in a contrasting background paper to match the ATC. The ATC was then attached to the tag base. I then die cut pionsetta petals from black cardstock and assembled. Holly leaves were the die cut from gold cardstock for contrast. The flowers and the leaves were then attached to the tag base. To finish the sentiment was stamped and layered and mounted onto the tag with 3d foam. Black organza ribbon was added to finish.


Thursday 19 November 2015

Smeared and Smudged Member Blog Hop


SMEARED AND SMUDGED MEMBER BLOG HOP
Fiona
Titbelsoeur
Susan R.
Lyneen
Susan S.


Good morning and welcome to the Smeared and Smudged Members Blog Hop. The theme for November is Grunge a good excuse to get down and dirty with your craft stash. The blog roll is at the top of the post so do stop by and see what grunginess all the other participants have created.
Also, don't forget the S&S rule that is has to be stamped somewhere (digi stamps are fine) – we love when you use Smeared Ink stamps, but it is NOT a requirement
 
 
For my project I decided to create a dimensional piece. An ATC on a Tag on a Tag. I started off by creating my Tag bases. The large one from MDF and the smaller one from mount board. I inked them up with distress inks in frayed burlap, gathered twigs and ground espresso. I then splashed with water droplets and dried with a heat tool. I then used Andy Skinners Industrial stamps to stamp over the tag background with coffee archival ink to give a feeling of texture. I then Stencilled the sides of the tags with An Andy Skinner stencil and put aside to dry. I then created my ATC using the  Skull Front digi stamp from Smeared Ink.Rinted off and attached to an ATC base cut from mountboard for stability. I then die cut flowers using the Tattered Florals die from Tim Holz, distressed them using the same distress Inks used for the tag bases. I then assembled everything together added the flowers and some twine and rustic elements to finish.


Thanks for stopping by today. Your comments are very much appreciated.
Hugs Fiona.


Sunday 15 November 2015

Smudgy Antics midway post and Rick St Dennis Progressive Challenge.


I am doing double duty today so bear with me folks.
 
First up is my project for Smudgy Antics as part of the Smeared Ink DT.
 
NOVEMBER 2015 " ANYTHING GOES....WITH AN OPTIONAL TWIST"
 
The TWIST this month is
Metal Madness
You don't have to use the TWIST.
 
Remember please keep your projects, DARK, MACABRE, CREEPY,SAUCY,NAUGHTY,WICKED, or just plain AWESOMELY UNNACCEPTABLE.
 
For my project I used the fabulous digi Image Music is the Cure from the Smeared Ink Store. I coloured her up with copics, scanned into photoshop and added my text. Printed out and added to a cheap plastic frame which had been given two coats of black gesso. Gilding wax was added to the raised areas to make the frame pop.


Next up my project for Rick St Dennis MFA Progressive Challenge Part One as part of the DT. Anything Goes.
 
I used Rick's fabulous Image Bal Masque available from his Zibbet Store. I coloured her up with copics in shades of Teal and set to one side. I then set about creating a mixed media canvas also using shades of teal paint, sprays and mica powders with a touch of gold. Once complete I added the coloured Image to a frame and attached to the canvas.


Thanks for stopping by today.
Hugs Fiona.


Sunday 1 November 2015

DT Inspiration with Smudgy Antics.

 
Happy Sunday everyone. Now the Halloween festivities have ended ( not for me LOL ) I am back today to showcase my project as part of the Smeared Ink DT over on the Smudgy Antics Blog.
 
 
Our challenge this month is as always 
ANYTHING GOES....
with a TWIST OF   ''METAL MADNESS''
if your mojo needs a little prod!
The only requirement is that you use a 
SMEARED INK image....
 
 
So for my project I have used the fabulous Smeared Ink Digi JUDE. I started by colouring her up with copics. matted and layered onto a black cardstock base, a base of Abigail Larson paper ( re- coloured) a base of black cardstock and finally matted onto an 8x8 card base. To finish I added a doodle border and a black satin bow.


Thanks for stopping by today, as always your comments are very much appreciated. Do check out the other DT members blogs for more Smeared Ink Inspiration.


Saturday 31 October 2015

Day # 31 of The 31 Days of Halloween


Welcome to DAY # 31 OF THE 31 DAYS OF HALLOWE'EN 
you can find all the details of this fabulous hop HERE.
The full blog roll is on my side bar and shall remain for
 the rest of the day until the hop has finished.


Well it is the final day and I am so glad I made it to the end. I would like to take this opportunity to thank Terra and Tori at Smeared Ink for hosting a Fabulously Wicked hop this year and  a big Thank You to all of the fabulous sponser's for giving away some awesome prizes, the wicked bloggers for showcasing some awesome and inspirational projects each day and last but not least a huge Thank You and appreciation to all the wonderful visitors to my blog each day for your wonderful comments to which I am grateful for. Thank You.
 
Well enough blabbering and onto my final project for today. I decided to alter a Jewellery box that I picked up from a charity shop for £1. Here is the before photo before I altered it more to my liking.


I started by removing all the brass hardware and sanding it back to remove the varnish. I then gave it two coats of DecoArt media fluid acrylic in carbon black and when dry a coat of DecoArt media satin varnish to protect. I then created my focal image in photoshop with digi stamps from my stash and printed out on my laser printer ready for an image transfer for the box top lid. Before applying to the box I stamped a Raven to the forefront of my design with Versafine ink in onyx black. I then applied my image transfer to the box lid and left overnight. Once dry and rubbed back  I applied a layer of DecoArt  Media Crackle glaze  to the box lid and left to dry. When dry I applied a coat of DecoArt Media Antiquing cream in black and wiped back to highlight all the lovely cracks. I then applied a coat of DecoArt Media satin varnish to protect. I added new silver hinges and attached the box lid back onto the base. The Brass handles for the front of the box were given a coat of pewter metallic paint and DecoArt Media Antiquing cream which was wiped back to age them, then re applied to the box front. I now have a Jewellery box more to my taste.


Thank you for stopping by today and your comments are so very much appreciated. Have a Fabulously Wicked Day. Happy Haunting


Friday 30 October 2015

Day # 30 of The 31 Days of Halloween


Welcome to DAY # 30 OF THE 31 DAYS OF HALLOWE'EN 
you can find all the details of this fabulous hop HERE.
The full blog roll is on my side bar and shall remain there all month long.
 
 
Well the witching hour is nearly upon us. One more day to go and I must say I am exhausted.
 
My project for today is an ATC Hanger and as it's Friday it is Smeared Ink Day. I have used one of the  Halloween Grumpies from the Real Rubber set available at Smeared Ink. I stamped the pumpkin grumpie on Neenah solar white cardstock with black versafine ink. I then coloured up the image with copics. I then fussy cut the image and embossed with triple thick clear embossing powder. I then created my ATC background and attached to a mount board base. I stamped the grumpie again onto the atc base and layered up my coloured and embossed grumpie on top with 3d foam. I then attached copper brads in all four corners of the atc before attaching the atc to a mixed media board which had been given a coat of DecoArt media fluid acrylic in carbon black. I then stamped my sentiment and mounted onto another chipboard base which had been given the same treatment. Attached copper brads to all four corners. I then punched holes into the sentiment board and attached to the main board with fine black chain. A ribbon hanger and bows were added to finish.


Thanks for stopping by today. See you tomorrow for the final post.Happy Hopping


Thursday 29 October 2015

Day # 29 of The 31 Days of Halloween


Welcome to DAY # 29 OF THE 31 DAYS OF HALLOWE'EN 
you can find all the details of this fabulous hop HERE.
The full blog roll is on my side bar and shall remain there all month long.
 
 
For my project today I have another ATC Tag to share. I created my background with some tim holtz lost and found paper which was attached to a mount board Tag base. I inked some splats through a stencil onto the tag background and then inked the edges. Next I created my ATC using digi stamps from my stash, printed out and attached to an ATC base cut from mount board. I stamped my sentiment frame with black archival ink and then stamped the sentiment in the frame. I then coloured with Rusty hinge distress ink and attached both the ATC and sentiment to the tag base with 3d foam. To finish some skull and cross bone ribbon was added.
 
 
Thanks for stopping by today. See you tomorrow. Happy Hopping


Wednesday 28 October 2015

Day # 28 of The 31 Days of Halloween


Welcome to DAY # 28 OF THE 31 DAYS OF HALLOWE'EN 
you can find all the details of this fabulous hop HERE.
The full blog roll is on my side bar and shall remain there all month long.
 
For my project today I have created a Halloween themed Lumiere. I used a sizzix Lantern die to die cut the parts from 300gsm cardstock for stability. I then inked up all the parts with Rusty Hinge Distress ink. I then Stamped all over the parts with a Tim Holtz stamp with black Archival ink. I stamped the skull image four times onto vellum with stazon ink for all the panels on all four sides. I then assembled. To finish black organza bows added to all four corners and a triple bow of pumpkin ribbon for the top. A pumpkin element was added to the front. A battery operated tea light fits snugly inside.


Thanks for stopping by today. See you tomorrow. Happy Hopping


Tuesday 27 October 2015

Day # 27 of The 31 Days of Halloween


Welcome to DAY # 27 OF THE 31 DAYS OF HALLOWE'EN 
you can find all the details of this fabulous hop HERE.
The full blog roll is on my side bar and shall remain there all month long.
 
I cannot believe I have made it this far. The end is nigh !
 
 
For my project today I have created a wall hanging using A stampendous stamp as my focal image. I started by stamping the crow in versa mark ink and heat embossed using black glossy embossing powder. I then went over the whole o the background with distress inks. As the image is embossed it acts as a resist. I then applied distress ink through a harlequin stencil to the right side. Water droplets were then splashed all over the background and dried. To finish the edges were inked with black. The same treatment was given to the sentiment piece of the hanger. Both the the background and the sentiment were then attached to chipboard bases which had been coated with DecoArt media fluid acrylic in Carbon Black. Holes punched in the corners and ball chain added for hanging. To finish a length of ribbon was stained and added.


Thanks for stopping by today. See you tomorrow. Happy Hopping
 

Monday 26 October 2015

Day # 26 of The 31 Days of Halloween


Welcome to DAY # 26 OF THE 31 DAYS OF HALLOWE'EN 
you can find all the details of this fabulous hop HERE.
The full blog roll is on my side bar and shall remain there all month long.


My project for today is an ATC Box to store all the ATC's I have made during this month long hop and space for a few more to boot. I created the box from scratch and constructed from chipboard. I them painted the whole box inside and out with DecoArt media fluid acrylic in carbon black. Whilst drying I printed off some Abigail Larson paper ( I love this paper ) to cover the whole of the box. Attached all the paper to the box. Added some paper to the inside box lid. I then attached Antique brass feet to the base and an Antique brass  closure to the front  of the box. I then die cut a frame and stamped my image inking the background with distress inks. Attached the stamped image to the box top and added the frame. Quite pleased how this turned out.


Thanks for stopping by today. See you tomorrow. Happy Hopping


Sunday 25 October 2015

Day # 25 of The 31 Days of Halloween


Welcome to DAY # 25 OF THE 31 DAYS OF HALLOWE'EN
you can find all the details of this fabulous hop HERE.
The full blog roll is on my side bar and shall remain there all month long.
 
 
For my project today I have another set of four ATC's. I used  Real Rubber stamps from Tim Holtz. I started by inking up my backgrounds with distress ink In Twisted Citron, Rusty Hinge and Wilted Violet. I then stamped my images and sentiment. Went around the edges of each atc with this cool speckle stamp from one of Tim Holtz's sets. I highlighted the sentiment on each ATC with a white gel pen to make it pop. Attached to mount board bases for stability and inked the edges to finish.
 
 
Thanks for stopping by today. See you tomorrow. Happy Hopping.


Saturday 24 October 2015

Day # 24 of The 31 Days of Halloween


Welcome to DAY # 24 OF THE 31 DAYS OF HALLOWE'EN 
you can find all the details of this fabulous hop HERE.
The full blog roll is on my side bar and shall remain there all month long.


For my project today I have a set of four ATC's. I used digital stamps from my stash and real rubber stamps from Tim Holtz. I started by printing out my digital images. I then inked up the backgrounds with distress ink in antique linen and hickory smoke. I then stamped the sentiment and the corner figure stamps. Attached to ATC's bases cut from mount board for stability and inked the edges to finish.


Thanks for stopping by today. See you tomorrow. Happy Hopping.


Friday 23 October 2015

Day # 23 of The 31 Days of Halloween


Welcome to DAY # 23 OF THE 31 DAYS OF HALLOWE'EN 
you can find all the details of this fabulous hop HERE.
The full blog roll is on my side bar and shall remain there all month long.
 
My project for today is  a sweet treat holder I made for the grandkids . So cheap and simple to make , but let me tell ya POUNDS to fill with sweets LOL. As it's Friday it's Smeared Ink day so I used a stamp from their Real Rubber set Danse Macabre as the focal image for my project. I created the base of the box with black 300gsm cardstock for stability. Matted the papers on all four sides. Stamped the image and embossed with black embossing powder, then coloured in with a white gel pen to make him pop. Fussy cut and attached to black cardstock before attaching to the front of the box. A Tim Holtz sentiment was stamped, fussy cut and attached to black cardstock then added to the box front. A paper rosette was cut using a Tim Holtz die and attached to the top box lid. To finish it was filled with sweet treats for the Grandkids. Think they might like this.
 
 
Thanks for stopping by today. See you tomorrow. Happy Hopping.


Thursday 22 October 2015

Day # 22 of The 31 Days of Halloween


Welcome to DAY # 22 OF THE 31 DAYS OF HALLOWE'EN 
you can find all the details of this fabulous hop HERE.
The full blog roll is on my side bar and shall remain there all month long.
 
 
My project today is an altered box chest that I constructed from a kit. I have named it The Undertakers Chest. This is a picture heavy post so bear with me today folks.
 After constructing the chest it was base coated with DecoArt Media Fluid Acrylic in carbon black.  .


I then covered the whole box with Papers from my stash inside and out.


 Die cut trims were then added as well as die cut frames. The undertaker images from Tim Holtz were stamped and applied to the box top and sides within the frames.
 

I then embossed and used gilding wax to create my Registry of Deaths Book. A die cut frame and label were then added to the book cover.

 
I then fired up photoshop and created my Death Certificates. Printed onto parchment paper and rolled up and applied black organza ribbon to tie. These store safetly within the box draw for when needed.


To finish an a Tim Holtz ink splat stamp was used over the whole box to finish.
 
 
Thanks for stopping by today. See you tomorrow. Happy Hopping


Wednesday 21 October 2015

Day # 21 of The 31 Days of Halloween


Welcome to DAY # 21 OF THE 31 DAYS OF HALLOWE'EN 
you can find all the details of this fabulous hop HERE.
The full blog roll is on my side bar and shall remain there all month long.
 
My project today is a wall hanging that I picked up at the pound shop and altered to suit my style. I started by base coating the whole thing with DecoArt chalky finish paint in carbon . When dry I roughly went over the whole piece again with DecoArt chalky finish paint in Primitive. Once dry I stamped the Scratchy Raven from Tim Holtz and the Sentiment from Quoth the Raven Rubber set from Smeared ink. Gave it a coat of clear wax to finish. Simple but effective.
 
 
Thanks for stopping by today. See you tomorrow. Happy Hopping


Tuesday 20 October 2015

Day # 20 of The 31 Days of Halloween

 
Welcome to DAY # 20 OF THE 31 DAYS OF HALLOWE'EN 
you can find all the details of this fabulous hop HERE.
The full blog roll is on my side bar and shall remain there all month long.
 
 
Today I have an altered Tea Light holder using Stampotique Rubber stamps. I painted the whole tealight holder with DecoArt Media fluid acrylic in Carbon Black. Whilst this was drying I stamped my images twice to give me four one for each side of the tea light holder base. and coloured up using copics. I then cut out and mounted onto a chipboard base. I then gave them a triple embossed treatment using ultra thick clear embossing powder to give them a mini tile effect. I then mounted again onto another chipboard base which had been given a coat of DecoArt Media fluid acrylic in carbon black. The tiles were then attached to the Tea Light holder base. Done.


Thanks for stopping by today. See you tomorrow. Happy Hopping.
...


Monday 19 October 2015

Day # 19 of The 31 Days of Halloween

 
Welcome to DAY # 19 OF THE 31 DAYS OF HALLOWE'EN 
you can find all the details of this fabulous hop HERE.
The full blog roll is on my side bar and shall remain there all month long.
 
My project for today is an altered pencil pot. I am always looking for creative ways to incorporate ATC's into my work. So I thought why not add them to a pencil pot. Neat Eh....... I created my four ATC's with a Poe theme using Digi images from my own stash and Real rubber images from Quoth the Raven set from Smeared Ink. Attached them to mountboard bases for stability and inked the edges. Next I painted my pencil pot with DecoArt Media Fluid Acrylic. Once dry I then stamped all four sides with an Andy Skinner Mixed Media  Crackle stamp in black Archival ink. Gave it a coat of DecoArt Media Satin Varnish to protect. I then attached my ATC's to all four sides. They fit a treat. To finish I covered some pencils in spooky Washi tape and gave them a coat of stain varnish to finish. Am quite pleased how this project turned out. Below is pictures of all four sides.


Thanks for stopping by today. See you tomorrow. Happy Hopping.